SI Editor Table Menu - Tips and Tricks

In this Topic HideIn this Topic Show
  1. Editing Formatted Tables with Revisions
  2. Using this Feature
    1. To Duplicate a Formatted Table for Editing With Revisions:
  3. Copy and Paste
    1. Cells, Columns or Rows
    1. Entire Formatted Table
    1. Selected Row(s) or Column(s)
  4. Using this Feature
    1. To Copy an Excel spreadsheet, Word, or other table into a SpecsIntact Formatted Table:
  5. Saving Edits
  6. Edit Mode
    1. Colors and Tags
    1. Merge and Unmerge
    1. Undo and Redo
  7. Cell-to-Cell Navigation
  8. Right-Click Menus
    1. Table menu
    1. Edit menu
    1. Browse To Hyperlink menu
  9. Selecting Columns, Rows, Cells Or Table
    1. Adjusting Row(s) and Column(s)
  10. Tailoring
  11. Brackets
  12. Technical Support Information

Before you begin editing a new Formatted Table it is important to understand how they function. SpecsIntact Formatted Tables are a unique breed specifically designed for the SpecsIntact Editor. There are several menu items available while working in tables, either by choosing the Table dropdown menu or taking advantage of the right-click menus.  To make editing Formatted Tables easier, TagsSpecsIntact relies on tags to control content, and formatting, automate processes, and generate reports. These special markers, like <SEC> and </SEC>, define elements and attributes within the specifications. Some tags, like <Page />, function independently. In essence, tags are the building blocks of SpecsIntact documents will only display while in the Edit Mode, even if the tags display is turned on.

Illustration Icon Indicating CautionTo avoid display issues, do not place text or brackets on the same line as a Formatted Table.

Editing Formatted Tables with Revisions

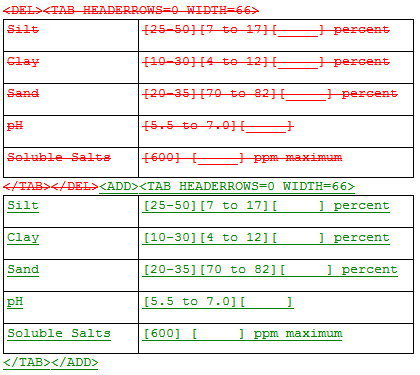
For the best experience editing Formatted Tables with RevisionsThe Revisions command reveals or conceals Revisions that are tagged in the text. Text to be added is identified with underscoring and the addition tags, <ADD> and </ADD>. Whereas text to be deleted, or Redlined, is identified with overstriking and the delete tags, <DEL> and </DEL>, we recommend duplicating the Formatted Table by: 1) selecting the Table 2) copying, 3) deleting, and then 4) pasting it below the existing Formatted Table. By doing this, the ADD and DEL tags will be eliminated from each cell that has been edited, making the Formatted Table easier to edit and read.

In the illustration below, the original Formatted Table was deleted and is now surrounded with DEL tags, whereas the new Formatted Table (duplicate), was added and surrounded with ADD tags. Therefore, the customer knows you have deleted the original Formatted Table and replaced it with a new one.

Illustration Illustration Editing Formatted Tables with Revisions

Using this Feature

Illustration Icon Indicating How To StepsTo Duplicate a Formatted Table for Editing With Revisions:

  1. From the SI Editor, navigate to the Formatted Table you wish to duplicate
  2. RIght-click on the Table, choose Select Table
  3. Press Ctrl+C to copy the table
  4. Press the Delete key
  5. Press Ctrl+V to paste the table

Copy and Paste

Illustration Icon Indicating How To StepsCells, Columns or Rows

The SI Editor's Copy, Copy Without Tags, and Paste commands can be used in many ways.  You can either copy and paste text into a table cell(s), column(s), row(s), the same table or other SI tables,

Illustration Icon Indicating StopFirst, you must Insert the required blank row(s) or column(s).

While you can copy (Ctrl+C) and paste (Ctrl+V) content from Excel or Word tables, SI Formatted Tables require a pre-existing structure. Insert row(s), column(s), or a newly formatted table before pasting your selection.

Illustration Icon Indicating How To StepsEntire Formatted Table

Some organizations no longer permit users to Save Excel XML spreadsheets.  SpecsIntact has simplified the process of importing Excel spreadsheets, Word, and other application tables using the Copy and Paste command.

To copy and paste a Formatted Table use the Editor's Toolbar Copy and Paste buttons, Right-click menu, or the keyboard shortcuts Ctrl+C to Copy, Ctrl+E to Copy Without Tags, or Ctrl+V to Paste.

Illustration Icon Indicating How To StepsSelected Row(s) or Column(s)

When copying and pasting selected Row(s) or Column(s), you need to insert a new Row or Column to receive the pasted data.

Illustration Icon Indicating StopThe capability to Copy or Paste multiple Table row(s), column(s) or an entire Formatted Table.

Using this Feature

Illustration Icon Indicating How To StepsTo Copy an Excel spreadsheet, Word, or other table into a SpecsIntact Formatted Table:

  1. From the SI Editor, go to the Table menu, and select Insert >Table or select the Tagsbar Formatted Table button Illustration SpecsIntact Explorer's Tagsbar Table button
  2. From the Insert Table window, choose the number of Rows and Columns that match the spreadsheet
  3. Copy the table from Excel, Word, or another application
  4. In the SpecsIntact Editor, highlight the entire table using the instructions below to Select Columns, Rows, Cells or Table
  5. Right-click and choose Paste or press Ctrl+V
  6. To Save the changes place the cursor outside the Formatted Table, and press Ctrl+S or select File > Save.

Saving Edits

To save edits within a Formatted Table, the cursor must be in another cell, outside of the one being edited or the table.

Edit Mode

The Formatted Tables edit mode is activated by left-clicking in a cell to begin inputting the data, formatting, or tagging.

Illustration SI Editor's Formatted Table Edit Mode

Colors and Tags

While in edit mode, the SpecsIntact Editor will not display colors, and will always show hidden text and tags. These limitations will not apply when viewing or printing tables.

Merge and Unmerge

The Merge and Unmerge Cells features are not available from the Table menu unless two or more cells are selected or the cell is a merged cell.

Undo and Redo

The Undo and Redo buttons are not always available, so it appears as though this feature cannot be used. The trick to using Undo and Redo with Formatted Tables, is to place the cursor outside of the Table then select the correct command.

Illustration Icon Indicating CautionOnce the SectionA set of files within the Division of a Master or Job that covers specific aspects of construction is saved, the Undo and Redo features are reset.

Cell-to-Cell Navigation

Use the tab key to move cell-to-cell or you can use the right and left arrow keys to navigate forward and backward from cell-to-cell.  The difference is between is the tab key will jump to the next cell, while the right and left arrow key will do the same unless you are in the edit mode and the cursor is in the middle of the cell's text, in which the arrow keys will move to the next character.  Once the cursor is positioned at the end of the cell, it will then jump to the next cell.

Right-Click Menus

There are three right-clickTo press the right button of a mouse and release it to open a menu menus available while working with Formatted Tables.

Table menu

Is activated by placing the mouse over the row or cell then right-clicking. This menu provides options available for changing the entire table.  This menu provides options available for changing the entire table.

Illustration Icon Indicating Important Information To NoteThe Merge and Unmerge Cells feature is not available from the Table menu or the Editing menu unless two or more cells are selected or the cell is merged however, the Unmerge All Cells feature is available.  To learn more, see the Unmerge All Cells topic.

Illustration Icon Indicating How To StepsMenu options that appear inactive require either cell(s), row(s), column(s) or text to be selected.  Click on the image menu option below to display details for each function.
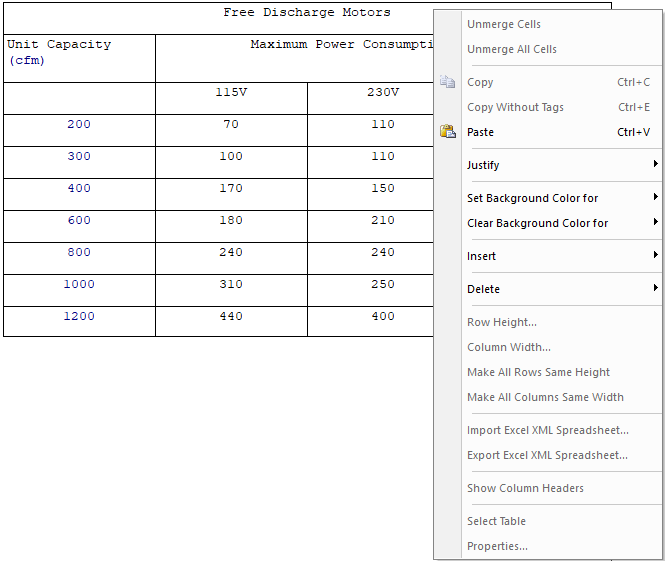
Illustration SI Editor's Formatted Table Right-click Table Menu

Edit menu

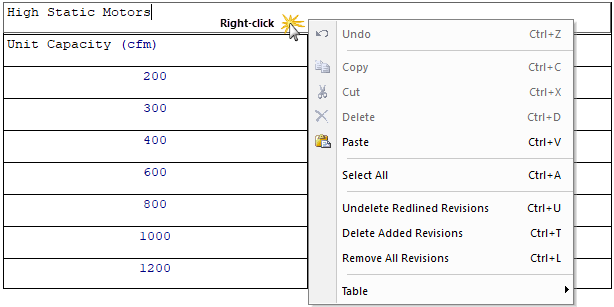
The third menu is the Editing menu that is available while in Edit Mode. To activate the Edit Mode menu click in the cell, and then right-click.

The Edit menu provides features such as Copy, Cut, Delete, Paste, Undelete Redlined Revisions, Delete Added Revisions, and Remove All Revisions. For additional convenience, this menu also provides an extensive pop-up Table menu.

Illustration SI Editor's Formatted Table Edit Mode Right-Click Menu

Browse To Hyperlink menu

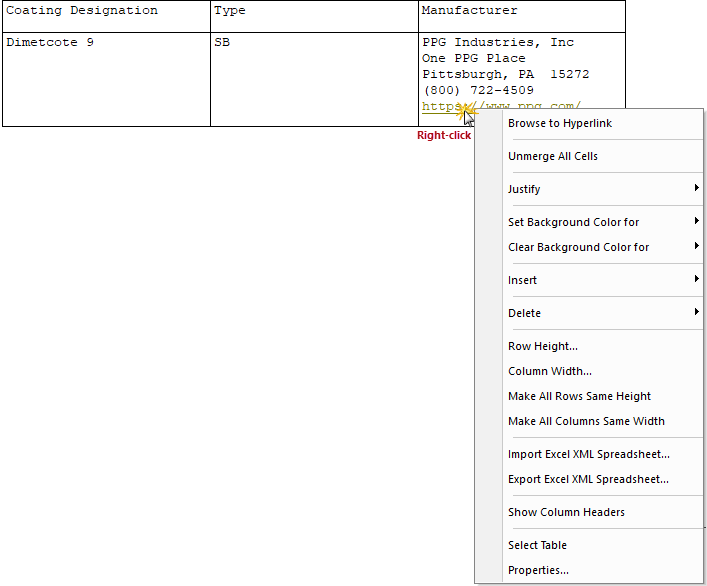
The second menu is activated by placing the mouse over a hyperlink then right-clicking and choosing Browse to Hyperlink.  Choosing this function will open the hyperlink in your default Browser (e.g. Google Chrome, Microsoft Edge, etc.).


Selecting Columns, Rows, Cells Or Table

This can be done by left-clicking and dragging the mouse cursor -- or --selecting the first Cell, then holding down the Shift key, and clicking on the additional cells

Illustration Formatted Table Selecting Cells

It is recommended that while working with SpecsIntact Tables the View > Tags Illustration Tagsbar Toggle Tags button command is turned off. To streamline the process, fill out the table completely before assigning tags. This will make editing in SpecsIntact Tables less complicated.

Adjusting Row(s) and Column(s)

When adjusting Row(s) begin adjusting rows from bottom to top of the Formatted Table or use the Row Height command.  When adjusting Column(s) start adjusting the columns from right to left or use the Column Width command.

Tailoring

TailoringTagged elements <TAI> </TAI> inserted by the Master Specification writer to indicate specific elements within a specification. These tags allow them to include or exclude requirements based on factors like agency or product. This pre-editing removes irrelevant requirements, simplifying customization for each project Options can be applied to an entire table, however, the Tailoring tag must be on the same line as the Formatted Tables TAB tag. Tailoring within a table becomes more complicated when adding or removing Tailoring Options since there is no way to tailor an entire row or column. To apply Tailoring, the data within the cells are tailored individually. When using the Tailoring Options tool to remove these options, blank rows or cells will remain, therefore, they must be manually deleted by the individual editing the Section.

Brackets

Inserting Brackets within a Formatted Table is more complex.  The complexity exists when a row or multiple rows need to be bracketed.

One option can be applied by separating a Table into smaller sets of tables, then adding the brackets just before the beginning <TAB> tag and just after the </TAB> tag.  An illustration of this method can be found in UFGS Section 26 32 15.00 10 entitled, DIESEL-GENERATOR SET STATIONARY 100-2500 KW, WITH AUXILIARIES, paragraph "Engine-Generator Parameter Schedule."

Another way is to consider keeping the data that would be surrounded by brackets in one cell, then place the brackets around that information, and carry the technique across each cell in that row. This way, if the bracketed option is removed all of

The cell's contents would also be removed. When the contents are removed from those cells using the Bracket Replacement feature, the row will also need to be deleted. An illustration of this method can be found in UFGS Section 26 32 15.00 10 entitled, DIESEL-GENERATOR SET STATIONARY 100-2500 KW, WITH AUXILIARIES.

Users are encouraged to visit the SpecsIntact Website's Support & Help Center for access to all of our User Tools, including eLearning (video tutorials), printable Guides, a Knowledge Base containing Frequently Asked Questions (FAQs), Technical Notes and Release Notes, and Web-Based Help.

CONTACT US:
256.895.5505
SpecsIntact@usace.army.mil
SpecsIntact.wbdg.org